Adding Juice
Overview
In the previous article (Randomization) we randomized the location of the coin when the player stepped on it. In this article we're going to give the coin a little more life by making it float and spin in place.
Logic Blocks Covered in This Example
- oscillator
- counter
- invert
- joints (not a logic block, but relevant)
By the end of this article you'll understand how to use the oscillator and counter blocks to manipulate values over time.
Related Information
If you're unfamiliar with visual scripting, consider reading Unbound's Logic Block Basics before continuing.
If you'd like to follow along or see the finished product you can download the file here.
The Story So Far
If you've been following along with this series, here's what we've made so far.
For those of you just here for the juice, you will be able to follow along without having read prior articles. But if you want the full context, this series begins with the Character Movement article.
Adding a Joint
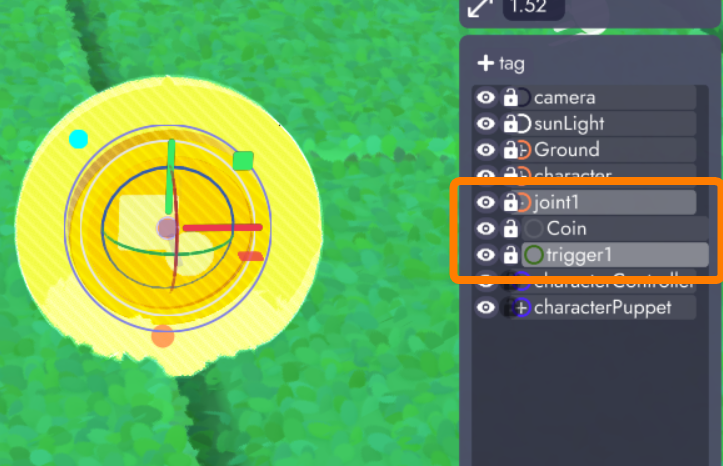
We're going to start by reorganizing our coin/trigger duo. Right now the trigger zone is a child of the coin:
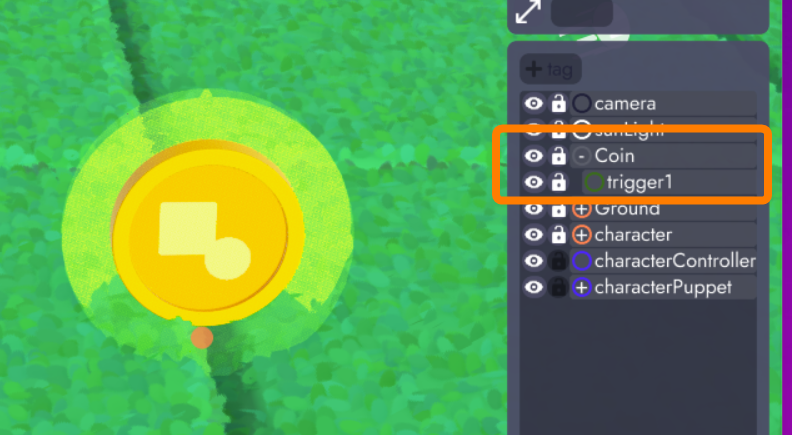
We did this to make sure that the trigger goes wherever the coin goes, which we still need. But because we're going to be adding additional movement to the coin that need not apply to the trigger zone, we're going to nest both the coin and the triggerZone under a joint.
Joints are like models with no geometry. They are "invisible containers" with a transform that can serve as pivot or rotation points. The orange and purple nodes on the character puppet are examples of joints. For this use case, we're not going to be rotating around the joint, but we do want to be able to move the children (the coin and the trigger) around together but retain the ability to also move them independently.
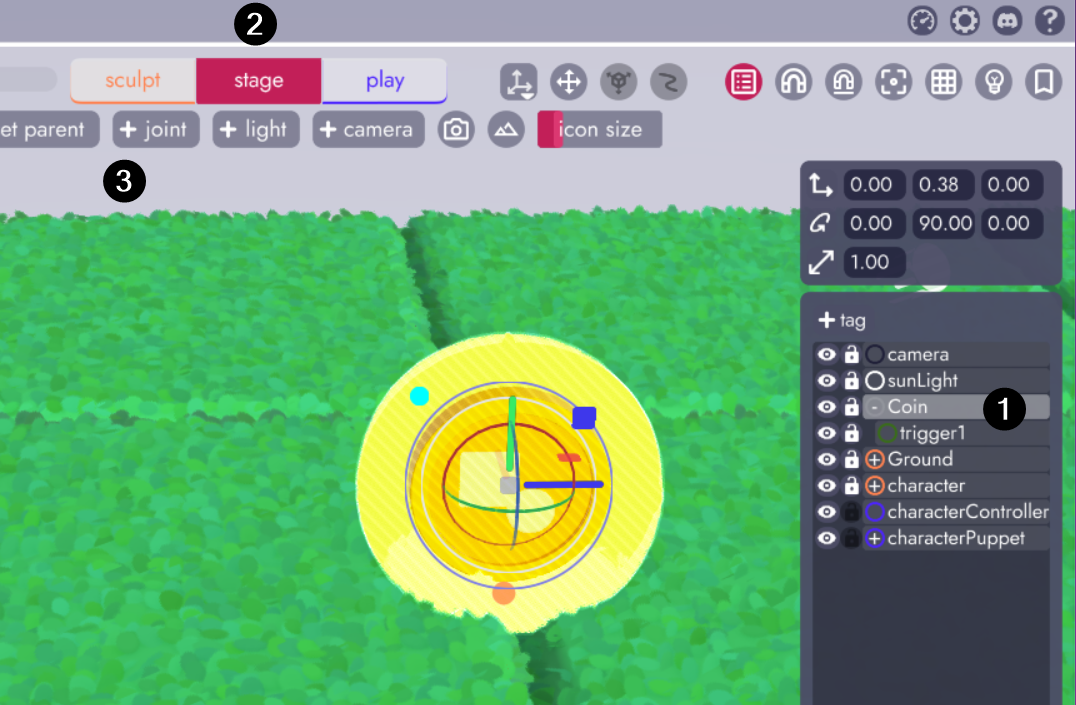
To make this adjustment, first select the coin in the hierarchy and then click over to the Stage tab:
After doing this, you'll see that a joint has been created with the coin and trigger zone inside of it. You may have to expand the joint to see its children by clicking the (+) plus next to the new joint in the organizer.
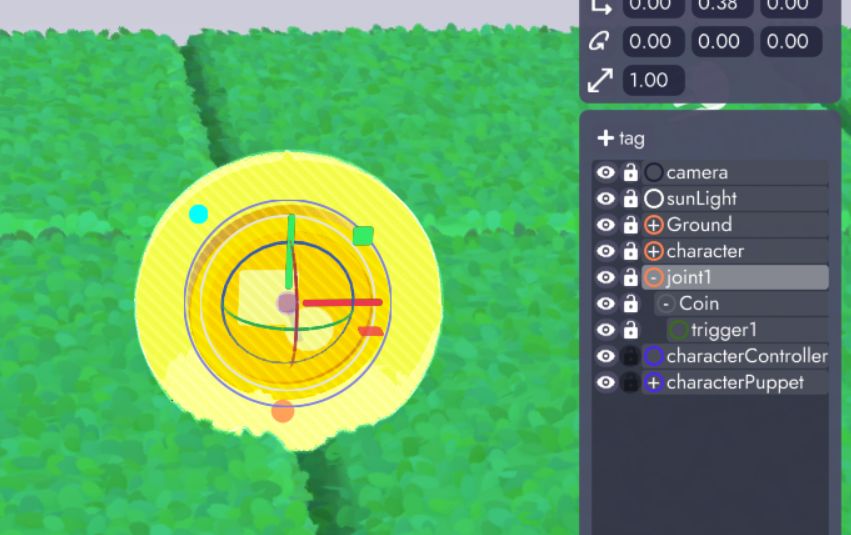
We're almost there. In order to be able to allow them to move independently of one another, they need to be siblings (both children of the same parent). Right now, the trigger is still a child of the coin. To fix this, click and drag the trigger onto the newly created joint. Once the coin and the joint are siblings, it will look something like this:
The trigger is no longer indented under the coin - they're siblings. This means we can use setTransform on the coin without affecting the trigger, but now we can also use setTransform on the joint to move both the coin and the trigger at the same time. Huzzah!
Tip
Now would be a good time to rename "joint1" to something more descriptive. Double click "joint1" in the organizer and change it to "CoinHolder"
Collapsed logic blocks hard to manage?
You can shift-click on collapsed logic blocks to select and move multiple logic blocks at a time.
. . .
You can make logic blocks a child of a model by dragging them onto the model in the organizer. Now those logic block will move with the model and disappear when you toggle off their parent's visibility!
Connecting to the Joint
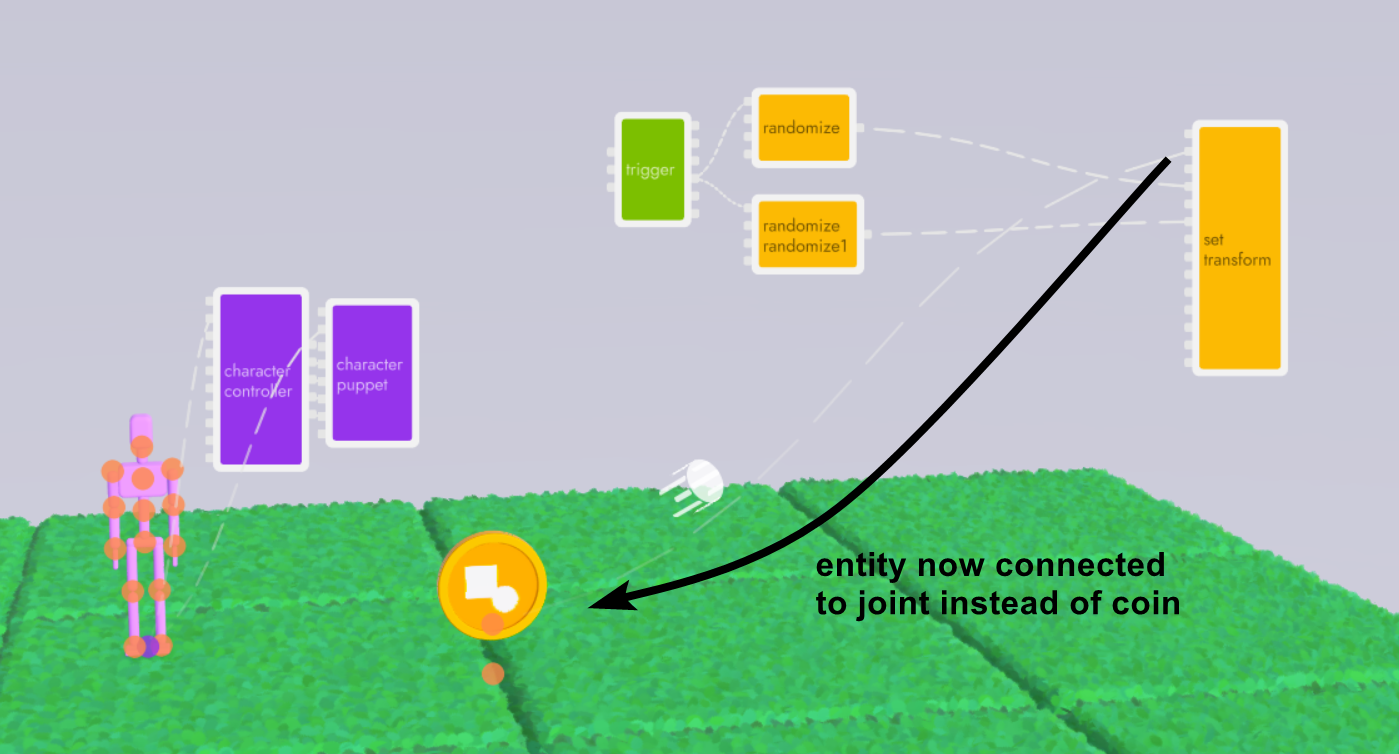
And now that we have our new joint, we're going to want to change our graph so that when the coin moves around we're moving "CoinHolder". If we leave it connected to coin, the coin will move inside CoinHolder and the trigger will not come along.
Switch back over to the Play Tab and disconnect setTransform from the coin by clicking on the entity input. This will break that connection. Now drag a new connection from entity to the joint (CoinHolder).
Having trouble connecting to the CoinHolder joint?
Because joints only appear in the scene as a dot, you may need to hide the coin and trigger to be able to see the dot and connect to it. Click the eye icon next to items in the organizer you'd like to temporarily hide. Once hidden, pay attention to the tooltip that shows before releasing the mouse to create a new connection. You should be looking for "CoinHolder" (or whateer you renamed your joint) before releasing the mouse to create the connection.
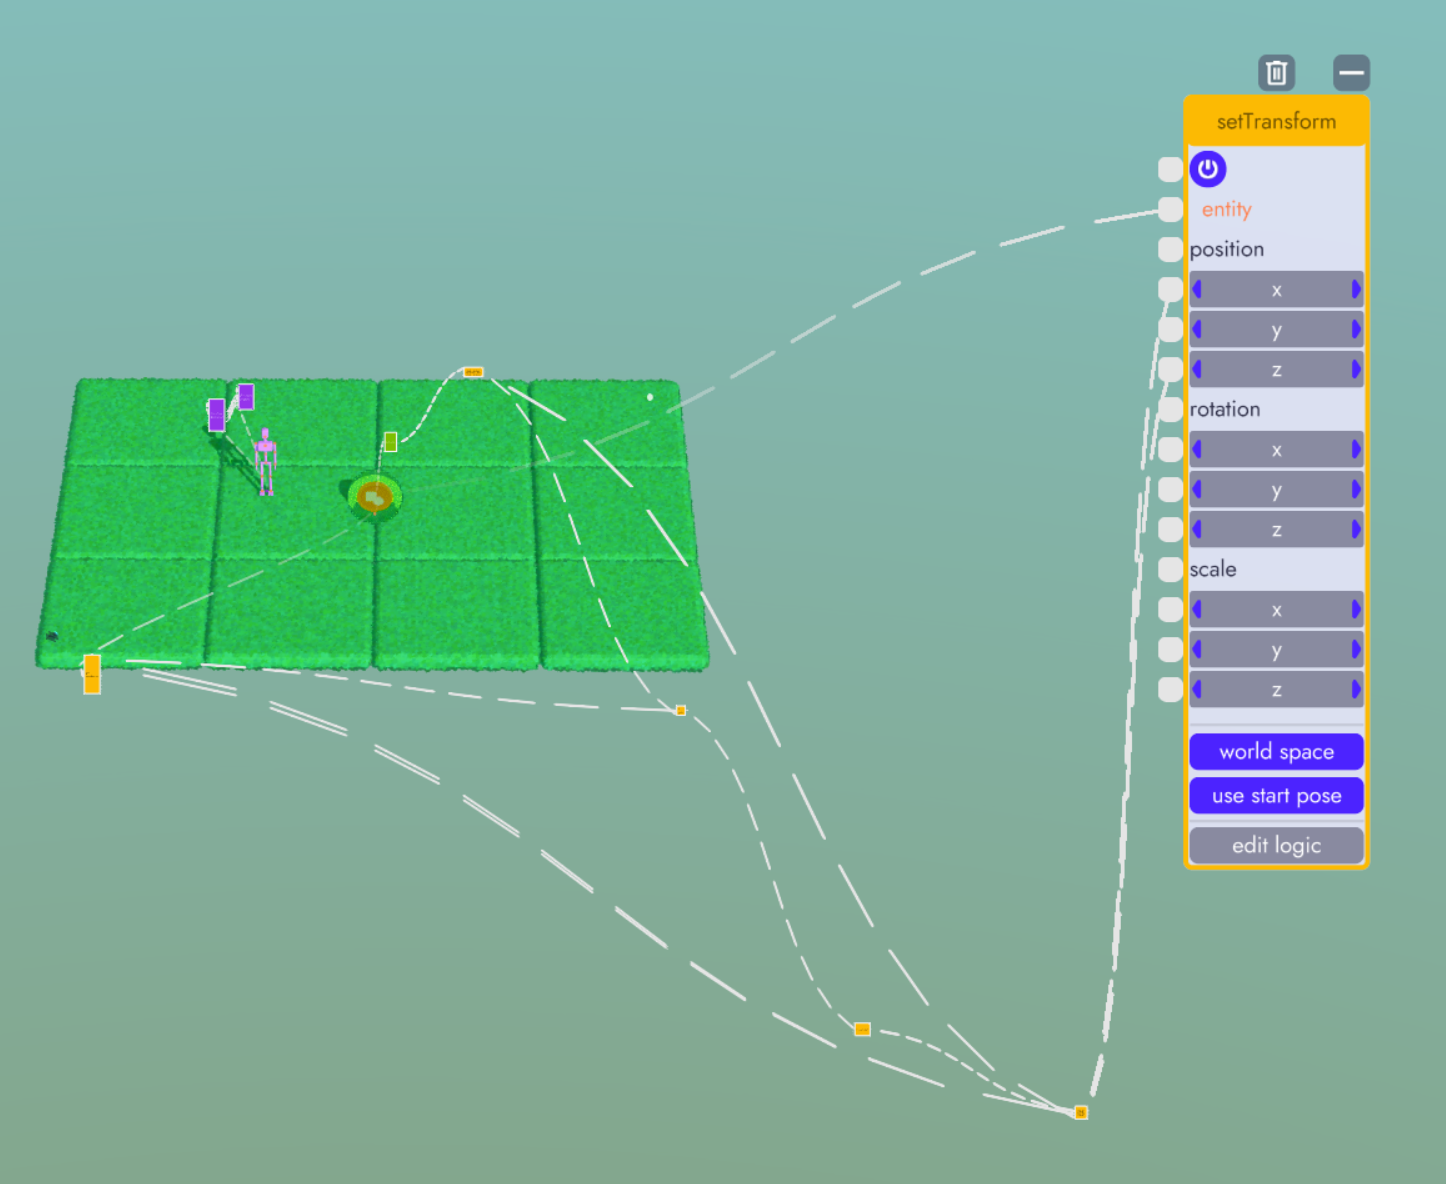
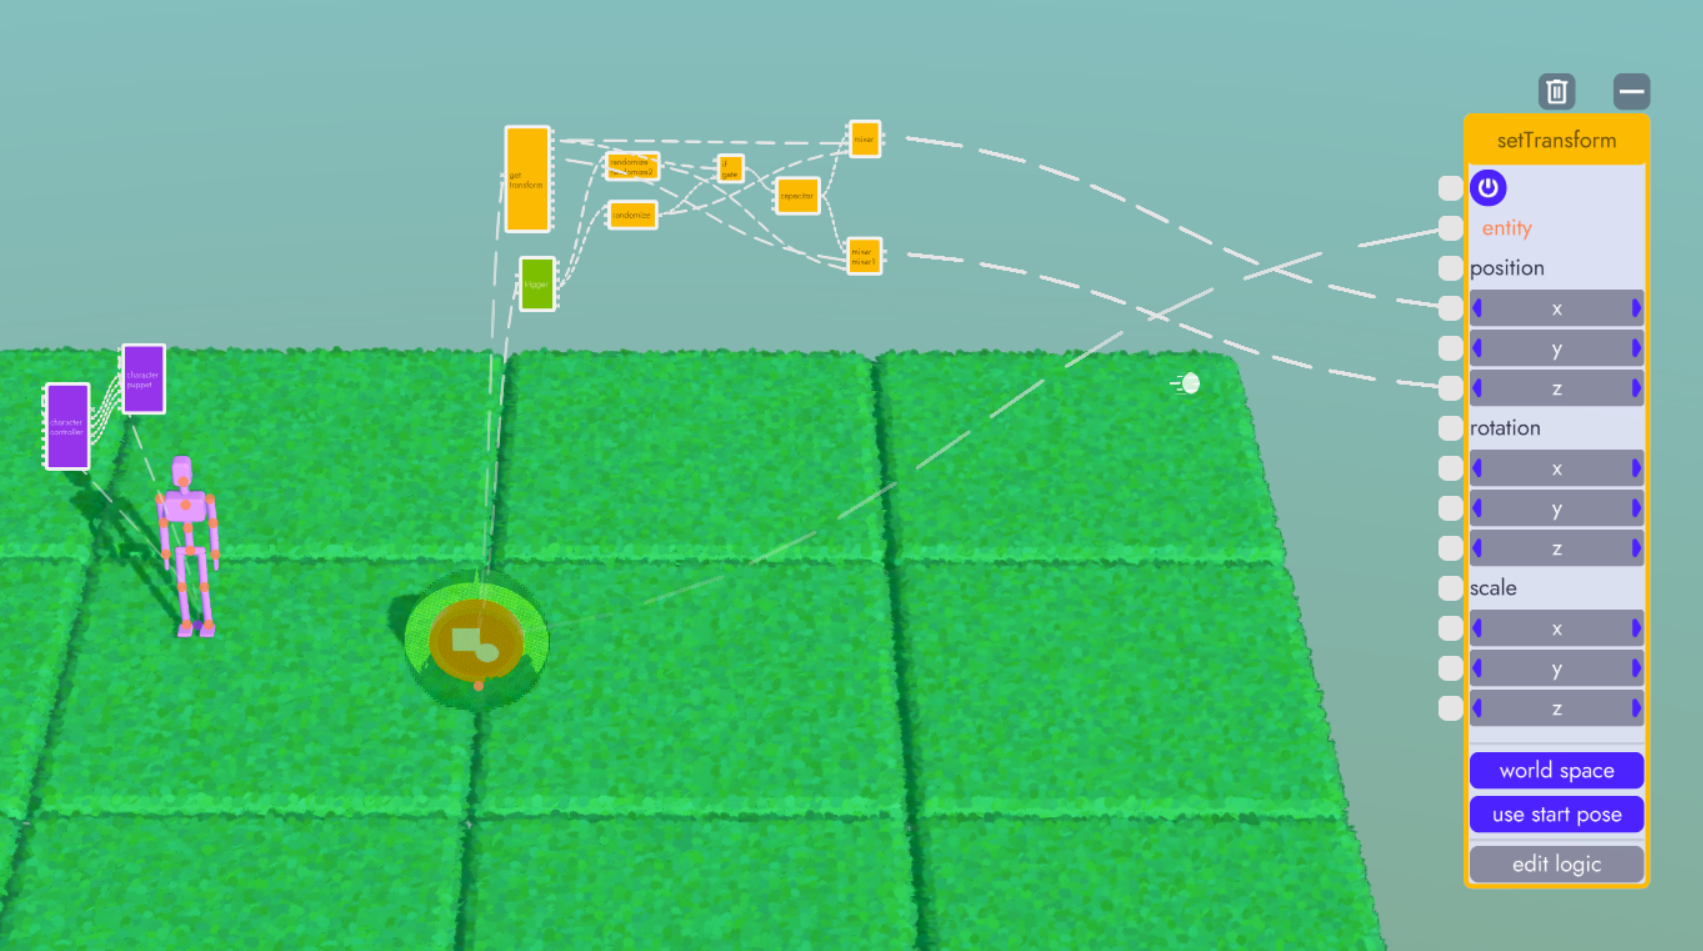
With this, we have our character controller and puppet wired up. The coin and trigger are nested under a joint. When the player passes through the trigger, two random values are passed to setTransform moving the CoinHolder and everything along with it. If you need a refresher, check out the article on Collecting Items.
It should look something like this:
Making the Coin Float
If you want players to collect certain items, it's usually a good idea to make them more visually enticing - give them some life to draw the player's attention and signal "value" to the player.
With our coin and trigger zone set up as siblings under the CoinHolder joint, now we can connect a new setTransform node directly to the coin, and attach an oscillator block to the coin's Y position to make it bob up and down inside the joint, without affecting its sibling (the trigger zone) or the parent (CoinHolder)
That setup will look something like this:
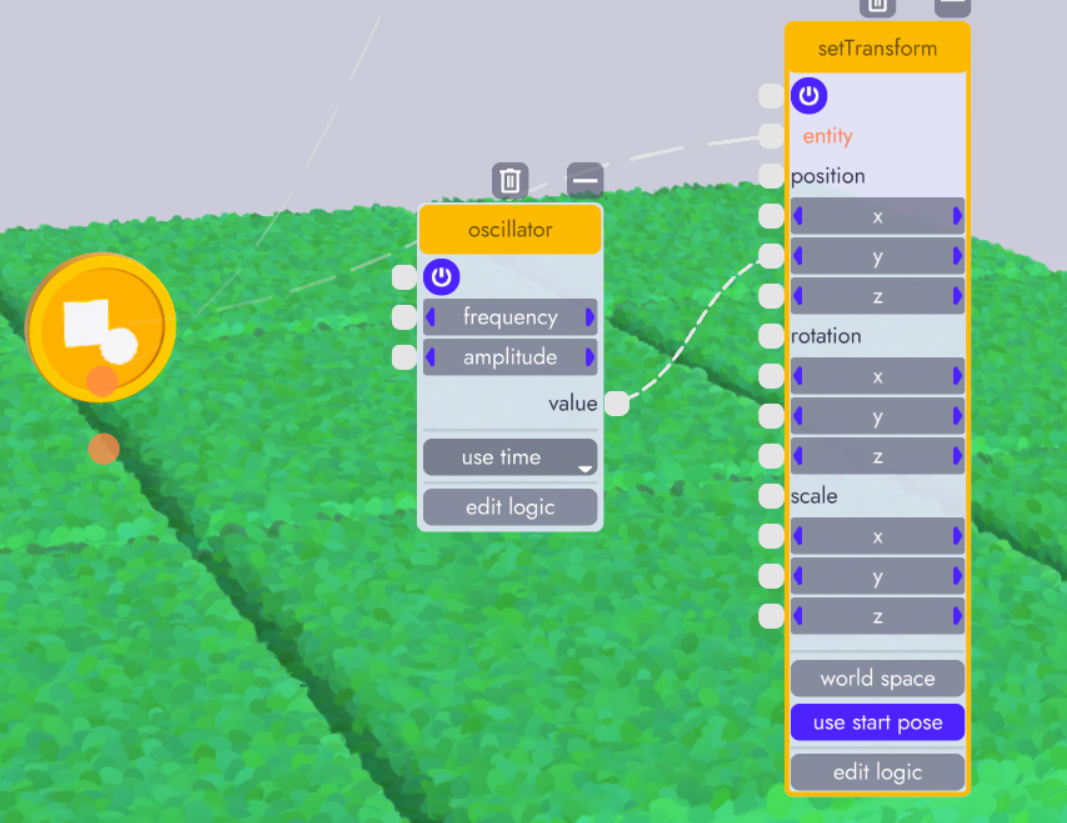
While the oscillator is running (purple power button is on) the value output will oscillate between negative * amplitude and amplitude. By default, the amplitude is set to 1, so the oscillator will give you values between -1 and 1 smoothed out by the chosen waveform. By default, the oscillator uses the sine wave.
By changing frequency you can control how long it takes to go between the extremes defined by the amplitude input. Let's set the amplitude to something small... because we don't want it going too high above the ground (Remember: we've connected this to the Y position, which will move it perpendicular to the ground in this example)
We'll enter 0.2 in amplitude and run the project.
That's already starting to look a lot more enticing. Since the trigger will follow the joint and not the coin, we don't have to worry about the oscillation (up and down motion) of the coin lifting the trigger off the ground to where the player won't be able to trip it.
What if my coins aren't on the ground?
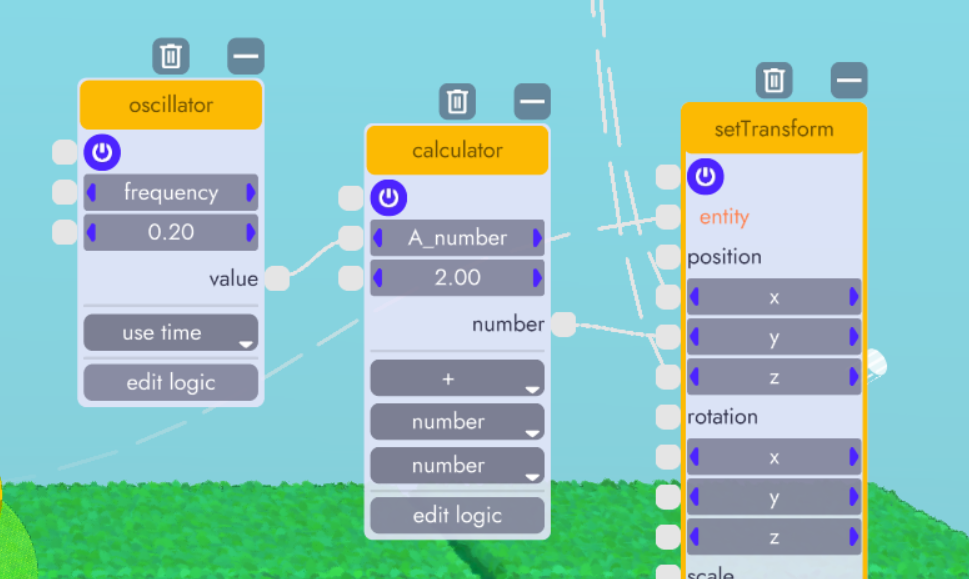
In this example, feeding the oscillator directly into the Y position of the coin works because the coin is by default right near 0 on the Y axis. If you want the coin to float relative to a point other than 0, simply feed the oscillator output to a calculator node and then add it to a fixed value.
With the amplitude set to 0.2, fed into a calculator that adds 2.0 to it, the coin will now oscillate between the Y values of 1.8 and 2.2 or, the added value +/- the amplitude.
If instead you want the coin's float to be relative to another model, you can feed the model's Y position into the calculator from a getTransform block and it will float relative to that model's Y position, even if it's moving!
Making the Coin Spin
We're going to use a similar method to make the coin spin by using a counter logic block. The counter does pretty much what you'd expect, it counts up on every frame. We're going to use that to adjust the rotation of the coin around its Y axis to make it spin.
As you can see, the oscillator still moves the coin up and down while the counter adds rotation. If it bothers you that the rotation goes above 360 degress (it bothers me a little) you can simply set the resetCount to 360 and the counter will return to 0 once it gets above 360.
You can increase increment to speed up the rotation or you could even try using an oscillator or timer here for different effects.
Making the Coin Appear
Now the coin is floating and spinning, but when it moves from place to place it's very abrupt. Let's use the animator to add a slight animation each time it moves to help sell the illusation.
Here's where we are:
And here's what we want to get to:
Not the world's most interesting game... yet, but we're getting to something more interesting than what we started with and we've learned a bunch of fundamentals along the way.
Let's start by looking at the final graph and then we'll break it down.
- A. handles character movement (covered in Character Movement)
- B. handles randomizing coin position (covered in Randomization)
- C. handles the juice
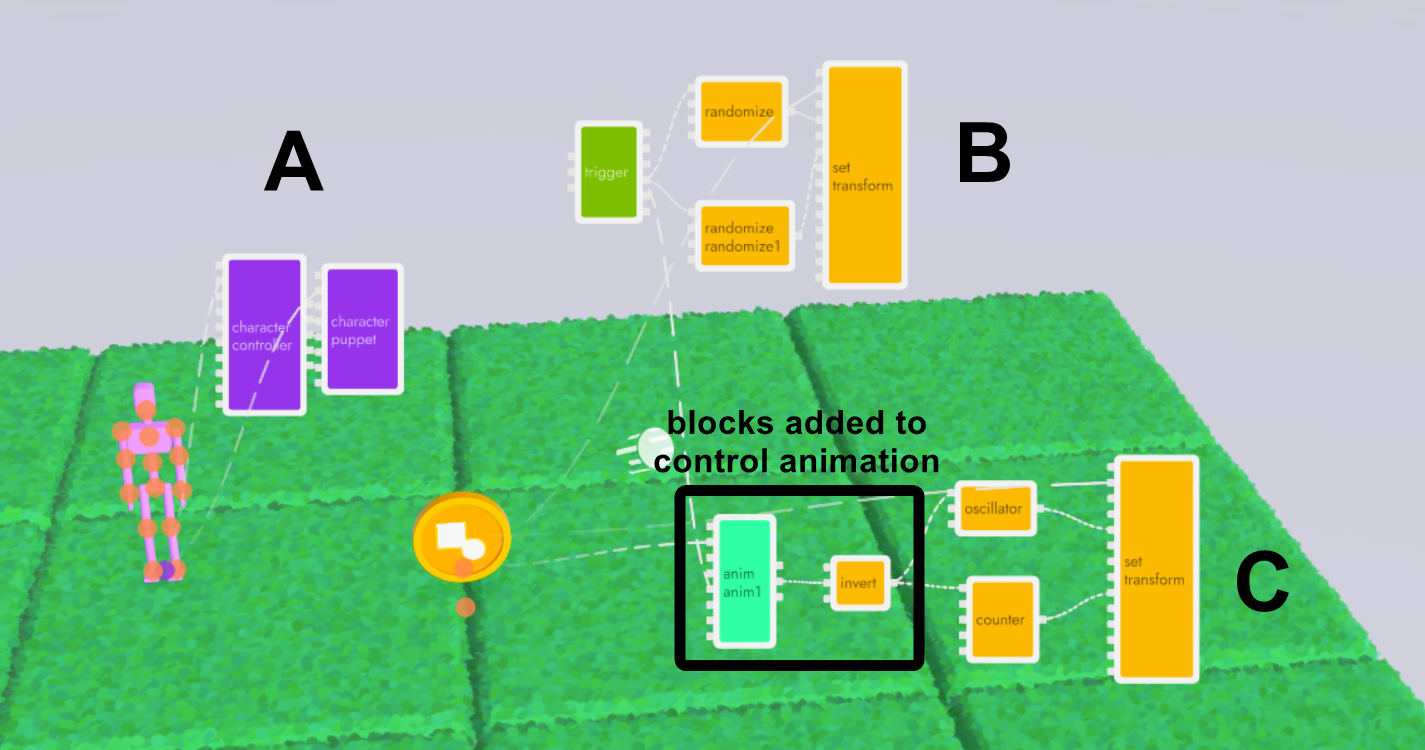
First let's create an animation to play when the coin moves. Mine looks like this, which animates the fade and emissive properties.
We're not going to cover how to use the animator here. For more information on that, check out our Using the Animator article.
Now let's wire it up to the rest of the juice we've applied to this coin.
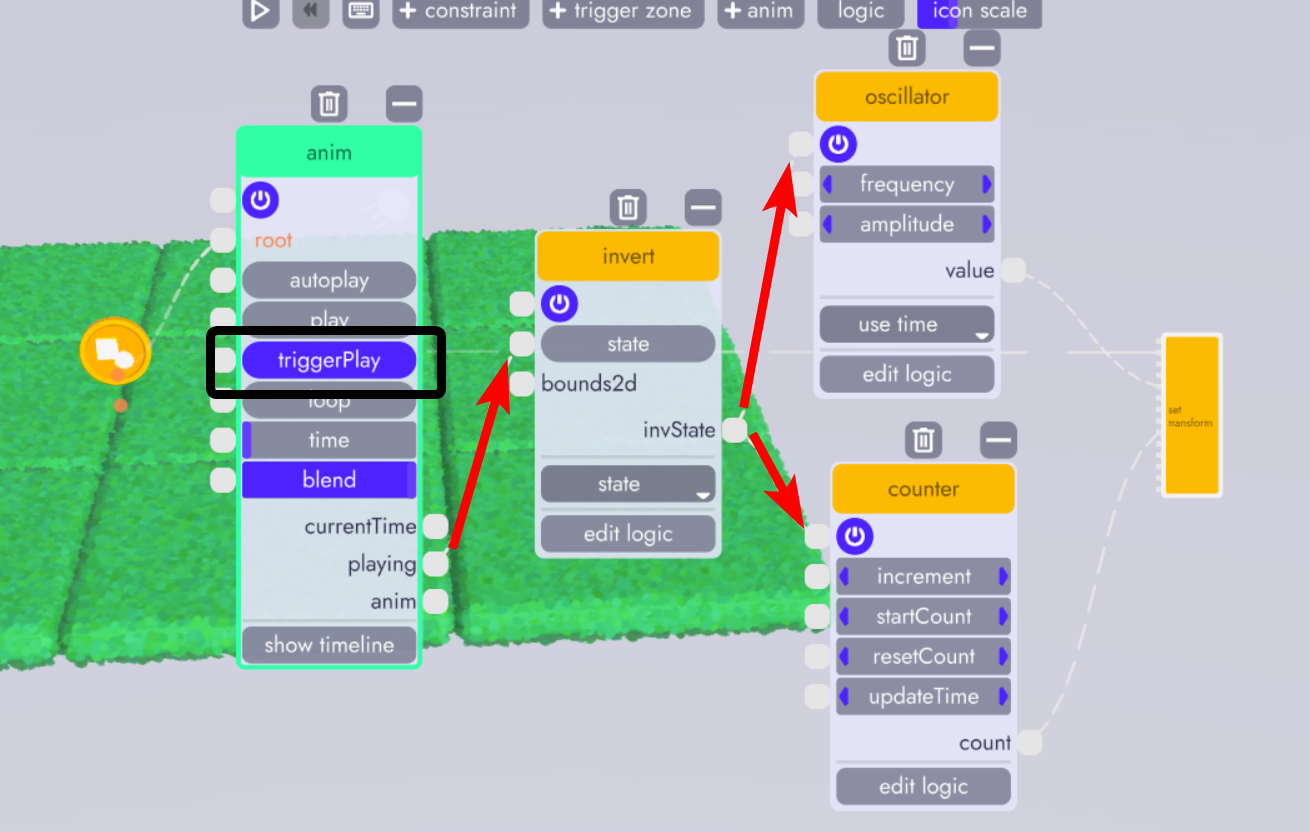
- Set the triggerPlay state on the anim block to true/on. This will cause the animation to play only when triggered. This is used more for animations that need to play once and all the way through to the end. By contrast, you might instead use the play state for the wheel of a car which will continually loop as long as the gas pedal is down (true/on) and never actually has a start or end position.
- Add an invert node and connect the playing output from anim to the state input of invert. We're doing this because we don't want the coin to float or spin while the animation is playing. invert will convert the playing output to false when it's playing (true).
- Connect invState from invert to the power buttons from both oscillator and counter. Because of the invert block, they will be off when the animation is playing and on whenever it's not, which is exactly what we want.
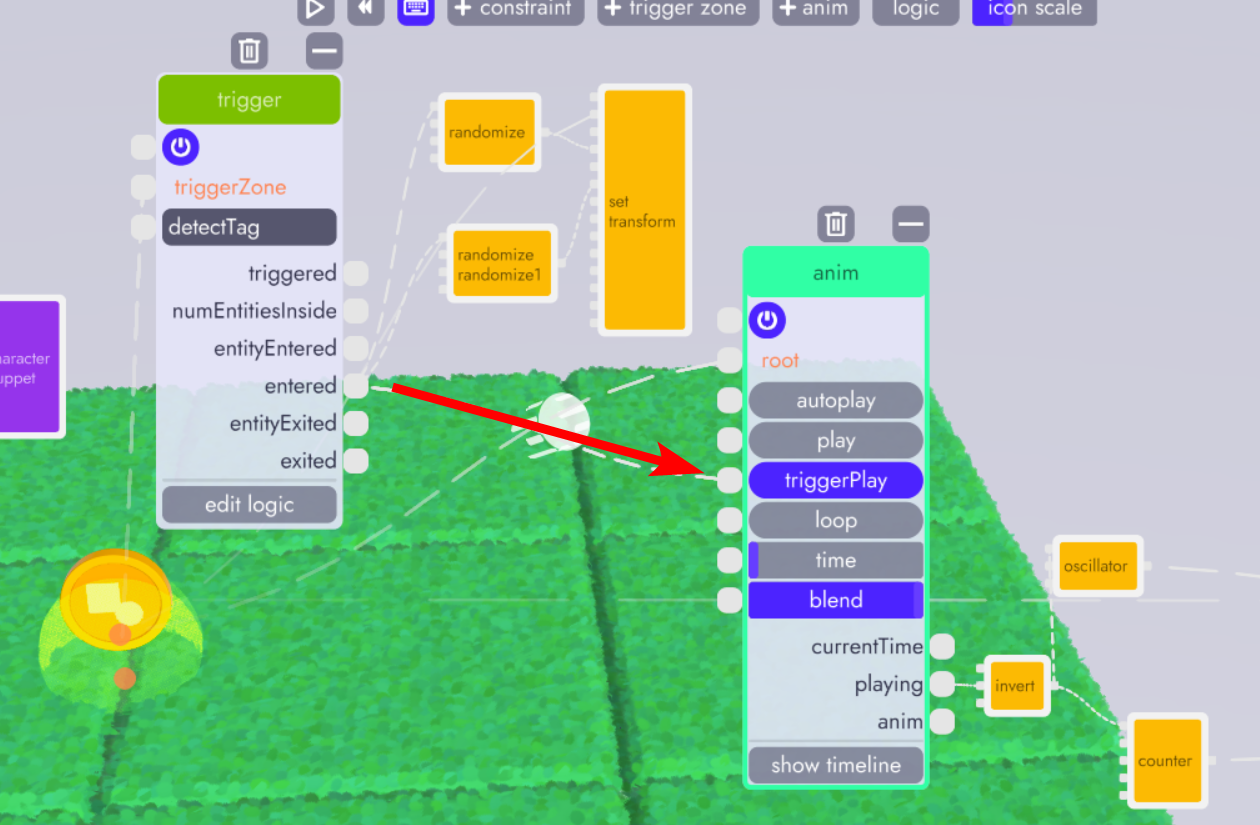
The last thing we need to do is connect the entered output from trigger (from group B above) to the triggerPlay input on anim. This allows us to start the animation at the same time we're triggering the random position of the coin.
And with that, now our coin is a bit more interesting. It spins, it floats, and it warps into view when it moves. This, of course, is just a simple example. Using these basic techniques you can create all sorts of custom juice (flair) for your project!
In the next article we're learn about storing and loading variables by making the boundaries of our world more dynamic.